The Italian Dolomites - 8 day Autumn Trip and Landscape Photography guide
I’ve just returned from an 8 day trip to the Dolomites in Italy and it has been absolutely incredible. My initial intention for this blog was just to share some of the images with you and my overall experince. However, I decided to turn it into more of a guide. I will share the locations, my gear list, thoughts and experiences. Hopefully this will help you if you ever decide to go yourself or with a group. I will include pin drops on google maps and rough travel times too.
Flights and Travel:
Our trip started out on Friday 28th October. We flew from Dublin airport to Bergamo airport in Milan. I would try and fly closer to the Dolomites if possible as Bergamo is a 4 hour drive to where we were staying in Colle Santa Lucia. Flights go to Venice which is a shorter spin, little over two hours. Renting a car is a must if you are a photographer in the Dolomites, there is no question. Driving in Italy was ok, the Italians tend to be impatient but just keep to your own lane and let them be the ones to pass you.
Accomodation:
As I mentioned above, our accommodation was an air BnB in the tiny village of Colle Santa Lucia. It proved to be an excellent base for multiple locations, the longest drive we had to do was 2 hours and this was towards the regions of Seceda and Alp De Suisi, two bucket list locations for any trip. A word of warning on the time of year, very little was open. We were in the Dolomites in that lull period between the end of the hiking season and the start of the Ski season. Not many restaurants or cafes were open near us aside from one or two towns. So perhaps aim for a little earlier in October or late September. One big plus of this was the reduction in photographers, we saw very little, even at the most iconic locations there might of only been one or two more. I loved this. I get uncomfortable when tripod legs are over on top of each-other as photographers jostle for a spot!
Bringing photography gear abroad:
I’ll explain how I travelled with my gear now. I have the F-stop tilopa backpack and large ICU for It. I paid for the 10kg cabin bag from Ryanair so this allowed me to fill the tilopa with my clothes and bring that on the plane along with the ICU which was filled with my camera gear. 4 of us went on the trip so we checked in one 20kg bag for tripods and other bits. This worked out well and the Tilopa fitted in the overheard no problem. it is a 50L pack.
My gear:
I brought the following gear with me:
Nikon Z6 camera
14-30, 24-70, 70-300 and 20mm lens.
Mavic 2 pro drone with 3 batteries
NiSi Filters
Rollei tripod with Benro geared head
If you are thinking about leaving lenses at home, depending on the time of year, I would leave the wide angle at home. In late summer it could be different when wild flowers are in bloom and there is plenty of foreground interest but here in Autumn I shot majority of my images with the 24-70 and 70-300 lens. The dolomites is a haven for long lens images. The drone was heavily used as well. I carried all this gear with me everyday and the Tilopa is an extremely comfortable backpack when hiking. 15% Fstop discount code available if you are interested, just contact me. In terms of clothes, i brought windproof hiking pants, hat, gloves, downjacket and two fleeces along with your obvious essentials in the clothing department! But it was only near the end of the trip that it got really cold. Footwear wide, i brought hiking shoes (not boots) and trail shoes. The trail shoes were a blessing as much of the terrain was very dry and comfortable to walk on.
Right, let’s get into the main reason for this blog : Photography!
Day 1:
Our first day started with a sunrise visit to the fantastic Passo Giau. The sun was rising directly behind us, forecast was for clear skies so we knew we wouldn’t get much colour but hopefully some nice light. We had seen images online of the mountains reflected in what looked like a lake. This lake turned out to be no more than a large puddle much to our amusement however it still provided some nice reflections. Now I am assuming the time of year had a lot to do with this but the lake (or puddle) was quite low meaning there was a lot of mud and other nasty things showing up out of the water which I cloned out of my shot. For parking you can leave your car here , it is a short walk up and over the hill to where you will see the lake. It is a lovely shot and composition. I chose to keep my blue hour shot from there as opposed to when the light hit and I really like it. I then went higher up the slope to get a better view and shot a pano looking into the valley below. If you have a drone there are some incredible peaks and valleys directly behind us however you will max out the 500m altitude limit trying to get there, so fly at your own discretion.

24mm, f/11, ISO 100, 15 seconds
On the way back we pulled in so many times, still taking in this incredible landscape. What I loved about my time in the dolomites was shooting images I had never seen before. Yes you will shoot the iconic spots and get that photo you’ve seen on instagram from your favorite photographer, however i encourage you to be different. I took this photo on the drone and I absolutely love it

Drone Shot - f/6.3, 1/120, ISO 100

Peaks of Cadini Di Missurini. Shot on Iphone 14 Pro with 3x zoom and edited in Lightroom mobile.
The evening took us to the famous Tre Cime. These were nothing short of incredible. If you type in Tre Cime di Laveredo this will take you directly to the parking for the hike. Bear in mind, 5km out from the parking is the entrance to the national park. It is a toll road and costs 30 euro per car. Steep enough but it saves you walking 5km uphill and then another hour hike into Tre Cime themselves. We arrived two and half hours before sunset to allow time to do the hike and find ourselves a composition. You will see another trail which leads up to the famous Cadini di Missurini peaks. These are also a must shoot but not on the same evening. More about them later. When you get below the Tre Cime stacks you can either veer down to the left and into the valley where you will have full view of the 3 peaks or you can climb a slightly steeper slope to shoot directly head on. That is what we done and you have a really nice composition of the path leading back down to the peaks. I sent up the drone and captured a 4 shot vertical pano just as the light crested in between the mountains. I love this image. With a long lens it is possible to shoot the Cadini peaks also and you can get the meander of the path through the valley in the frame which provides a nice leading line. Suckers for punishment we decided to stay on for some astrophotography even though the moon was up but still it was a cool experience. The hike down was a pleasure, it was mild and only took us 45 mins. Obviously goes without saying if you plan on staying out somewhere late, bring the necassary warm clothes and head torches.

4 shot vertical panorama on Dji Mavic 2 pro

Astro shot from Tre Cime - I went for a minimal star edit.
Day 2:
The view out my balcony window
Our travel day on friday had been long. We left our homes in Ireland at 2am friday morning and did not arrive in Italy until 9pm friday night. So after a long day saturday we decided to have a sleep in sunday and head out around 11am. Now, i still managed a shot out the window of our accomdation! Never had i stayed in a place with such a view.

Iphone 14 Pro, 2x zoom. Processed in lightroom mobile.
We made for the region of Funes, home of the famous Saint Maddalena church shot. There is also another church shot you may have seen in this region, this is St Johann Church. I was not that impressed with this, it appeared that you needed to be in the field itself to get a decent shot but it was all blocked off. Instead we made for the public car park located here , you then walk about 25 minutes up to the viewpoint. It is really easy to find, search “Panorama di Santa Magdalena” and it will bring you straight up to the viewing area where you will no doubt be standing beside multiple other photographers. The view is incredible though and the shot makes itself. I shot around 50mm to compress the church against the mountains in the background. The light was stunning. This location was around a 2 hour drive from our accommodation in Santa Lucia. I shot an image on my iphone 14 pro, zoomed in slightly to create more compression. For a phone, I was impressed!

50mm, f/16, 1/5th sec, ISO 100
Day 3:

300mm, 1/200th, ISO 200, F8
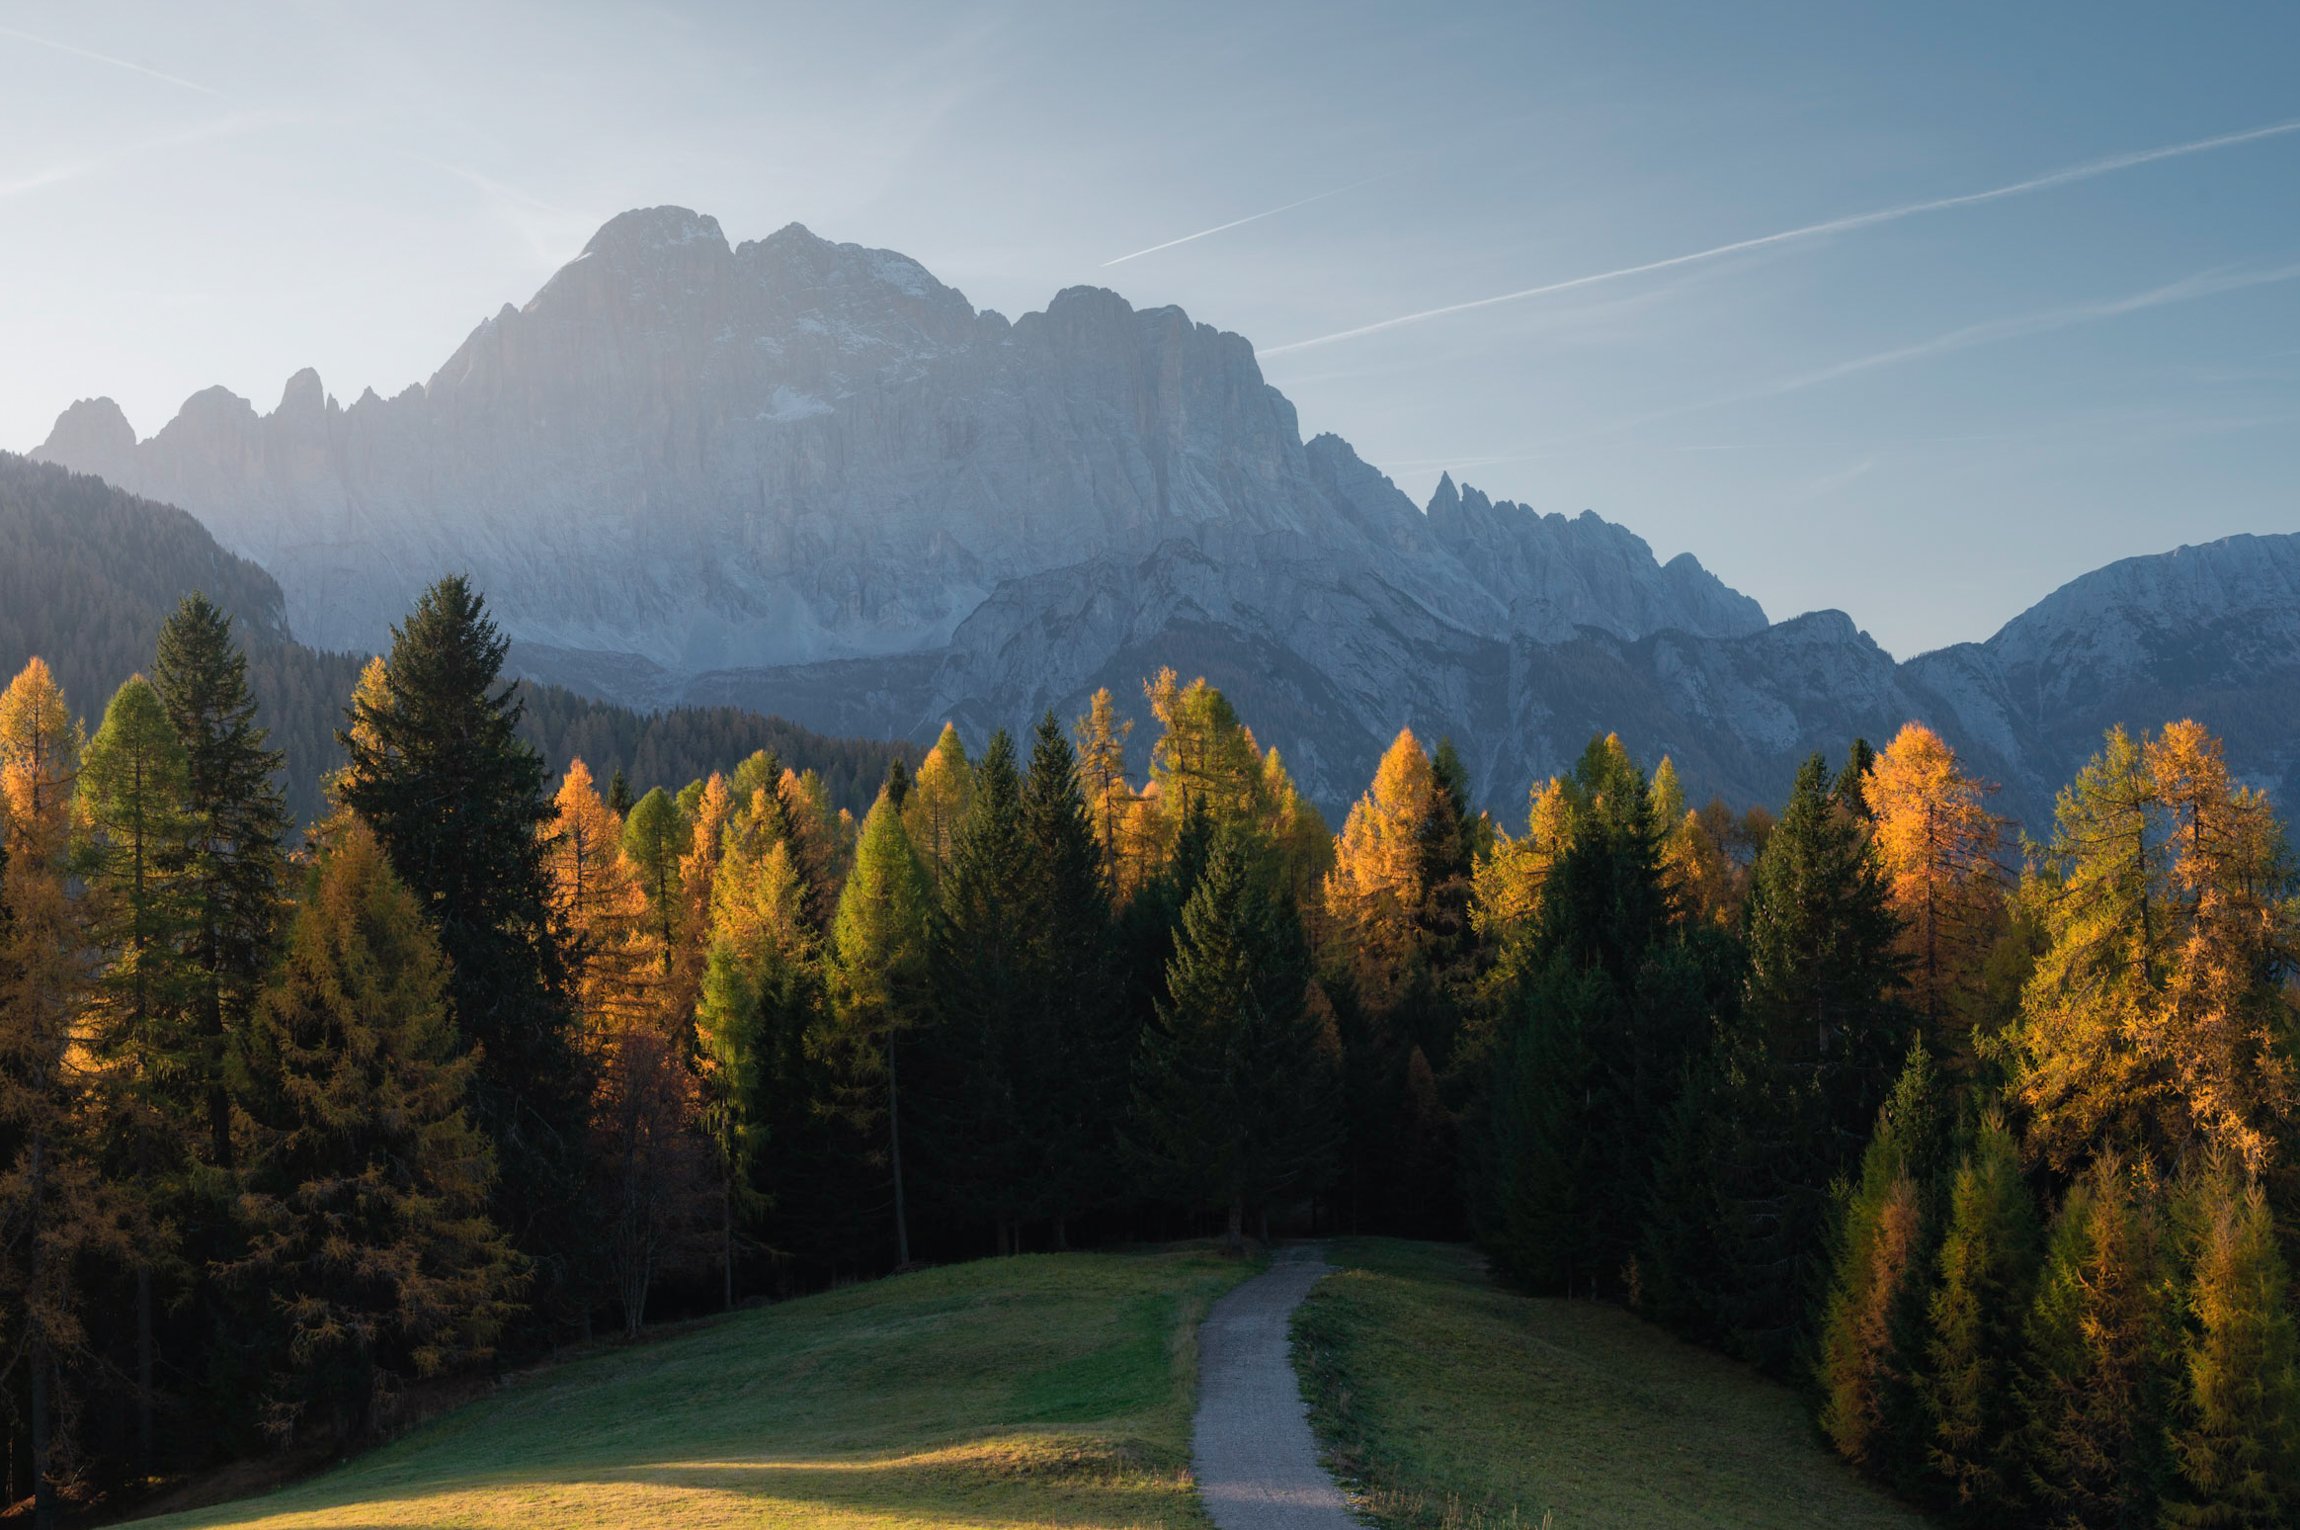
On day 3, we headed for what looked like a stunning lake in the mountains near the famous Cinque Torri. The lake is called Lago Di Limides. Parking available here and we walked up the ski slope turning left at the crest and heading east. What we found was a totally dry lake. Another lesson learned, in autumn many of the lakes may be dry as the snow has melted and the run off from the snow will have finished. If you plan on shooting lakes and rivers then late spring and summer is your time. However all was not lost, we had an incredible view towards the peak of Piccolo Lagazuoi and the light hitting it roughly 35 minutes after sunrise. Sent up the drone and as always from the air the dolomites looked stunning. It is worth noting that with all the high peaks and mountains around, the light may not arrive on the landscape until 20-30 minutes after sunrise. So be patient and wait for the light. I spotted a nice scene where a group of larch were lined up on a peak. Using the long lens gave me some nice compression against the mountains in the background.

3 shot pano on the drone of Lagazuoi at sunrise

300mm needed to compress the fantastic layers on this scene
The evening took us back to the Tre Cime national park but this time we were focussing on the Cadini. Wow, what an evening we had. Aside from the incredible peaks themselves, I heavily used the long lens shooting a far off Rifugio that was being dwarfed by a peak behind it. This scene was directly west as you stood in front of the Cadini Peaks. We did not go down to the iconic selfie spot for this composition, again I didn’t fancy going shoulder to shoulder with other photographers. This viewpoint was perfect and gave us plenty of room to shoot. Tre Cime was stunning as the light hit behind us and we were treated to very cool lenticular clouds at sunset. I’ll show you the images now.

120mm just as the light kicked off. ISO 100, f8, 1/50th of a second. You can see the Refugio at the bottom of the frame

Drone shot - ISO 100, f5.0, 1/13 second. Two exposures blended

50mm, f/10, 1/60 sec, ISO 100

15 seconds, f8, ISO 100
My advice for this location, 24-70 or 24-105 is perfect to shoot the Cadini peaks. If you have a long lens then look around and shoot the not so obvious compositions. This will possibly be one of the busiest locations you shoot but it is incredible. One the way back down we noticed the cars leaving and one of the lads (Paul) suggested a photo of the light trails coming down from the mountain would be cool. So we once again brought out the cameras, set up the tripods and got a pretty unique and cool shot. Well done Paul!
Day 4:
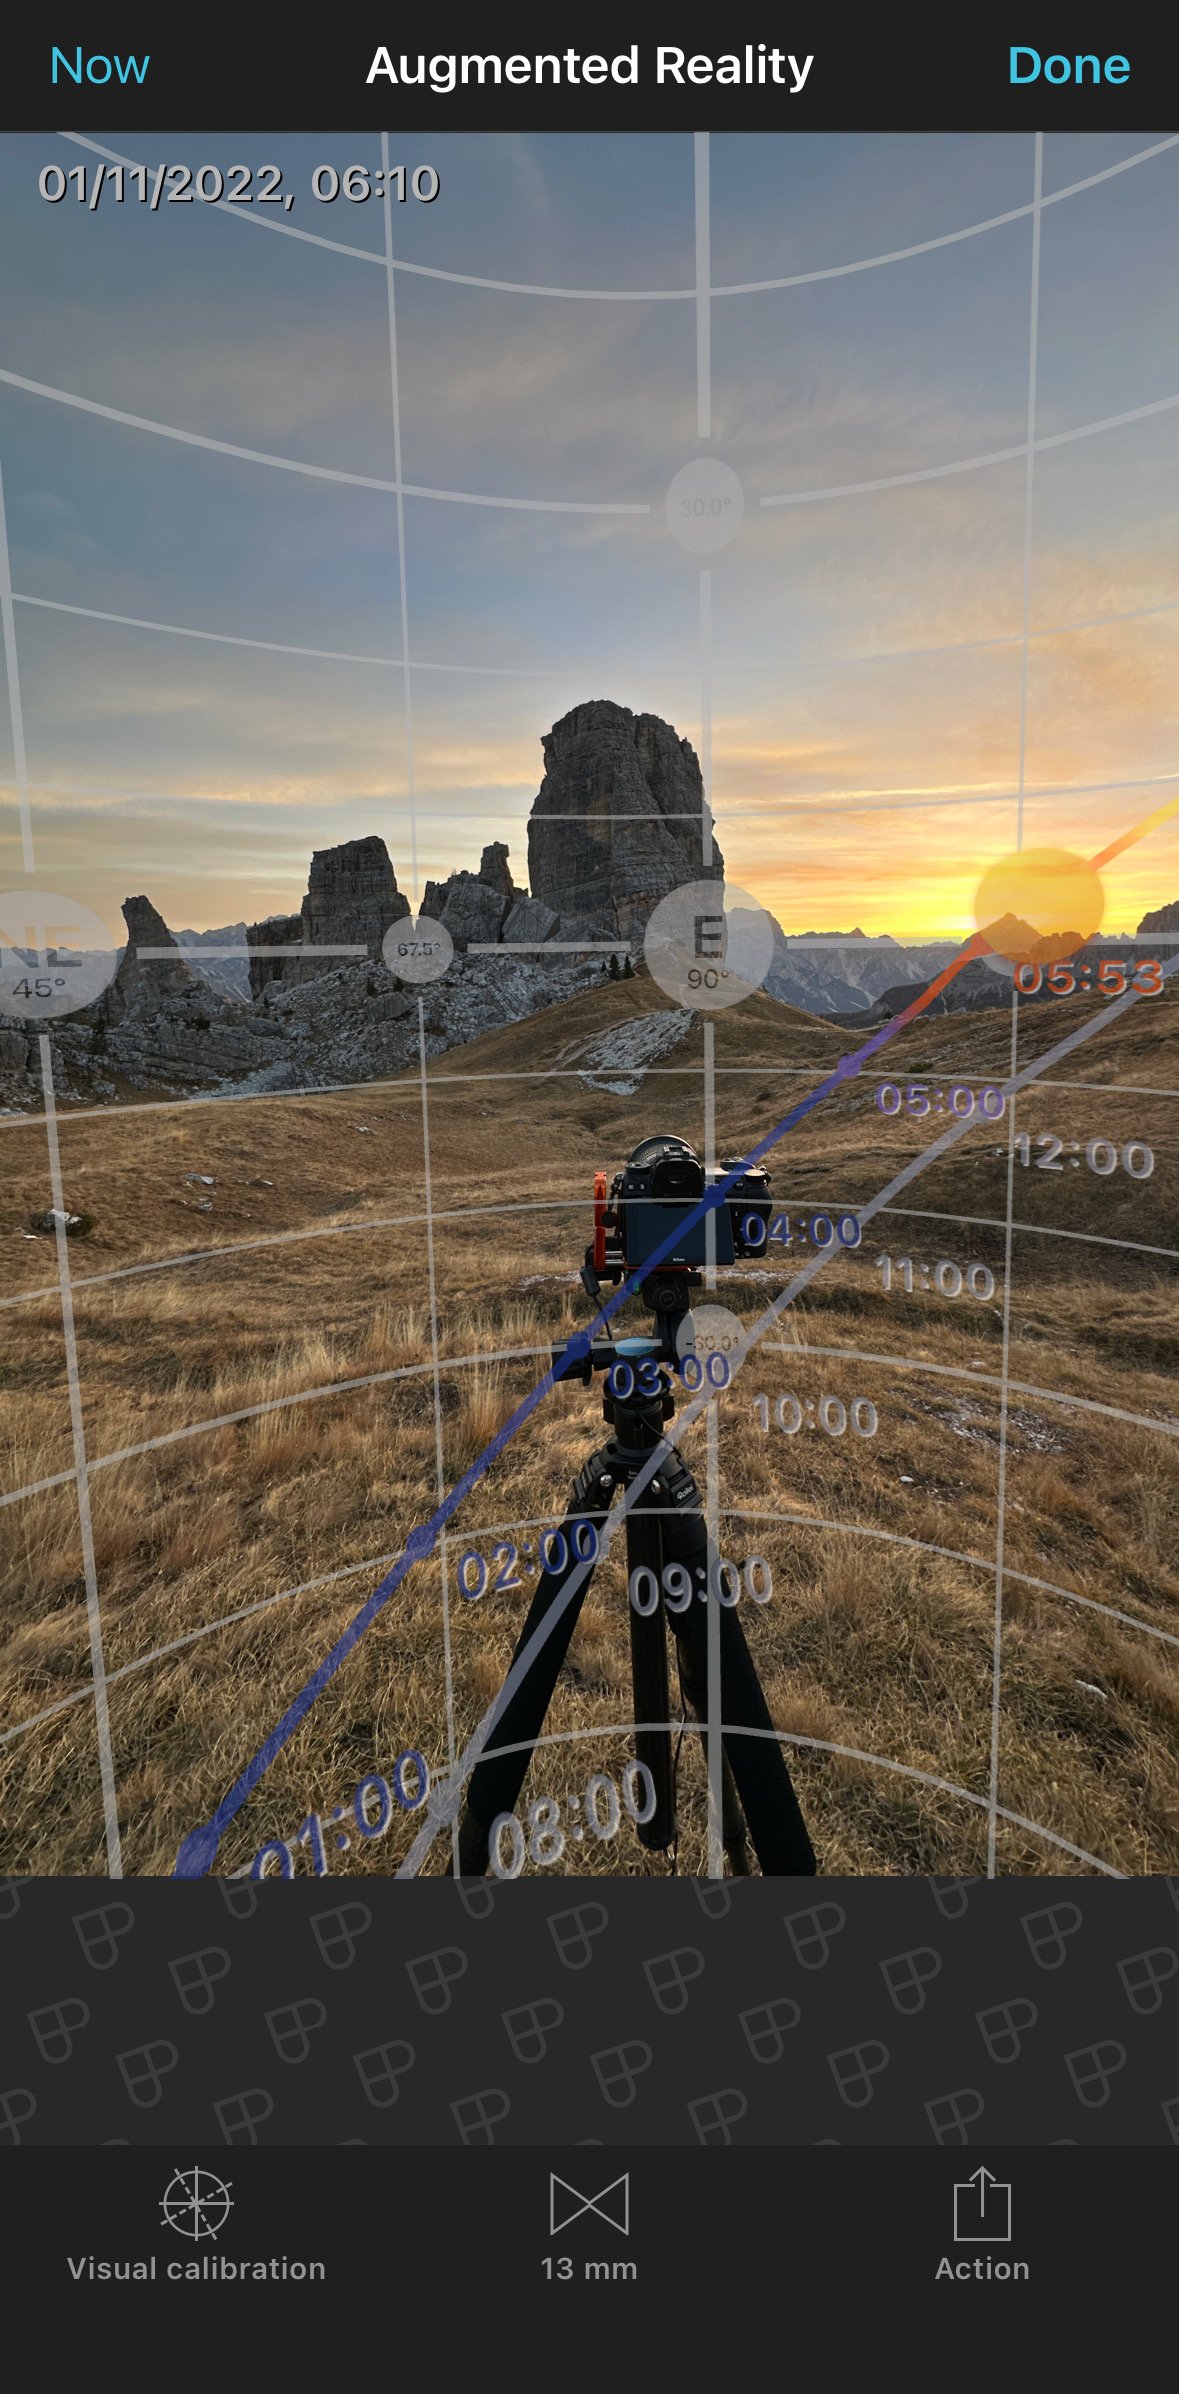
On day 4, we paid a sunrise visit to the famous Cinque Torri. Aside from being a very cool feature in the landscape, there are still remnants of WW1 trenches and cabins there from the war. I am a big fan of history and loved standing in the trench imagining the hardship those soldiers went through. In terms of parking, you can drive right up to the Rifugio 5 here. From the car park it is an easy 25 minute walk up to the mountain. The path is easy to follow. The sunrise we got at Cinque Torri was incredible with vivid pinks and reds in the sky. I chose to shoot the classic composition here with the path leading into the rock. This is one place I would love to re visit in summer when the wild flowers are in bloom. I am a big fan of a sunstar and I spotted an opportunity to capture one coming over the mountain. I have included a screenshot of photopills on my phone which I highly recommend for planning your landscape shots. I could tell where the sun would crest over the mountain and pick my composition accordingly. This location also gave opportunities for the drone and I shot a few pano’s to get the pathways leading up to the rock.

16mm, F14, ISO 100. Exposure blend

1/10th, F16, ISO 100. 20mm

Drone shot - 2 bracket exposure blend
As is often the case with a nice sunrise, the afternoon and evening brought rain. We drove an hour to Passo Gardena which really was an impressive place but it rained heavily and we were unable to shoot. I would encourage you to come back to this place, it lined up nicely either at sunrise or sunset! Back to the house for a few beers and an early night because the next morning we had a 2 hour spin to the incredible Alp De Suisi.
Day 5:

110mm, f/11, 1/50th sec, ISO 100
A 2am alarm clock had us up and out the door by 2:30am. The reason for the early alarm clock was because the parking for Alp De Suisi was roughly an hours walk from the fields where everyone shoots from. Now, you can drive into the valley, but you need to be out by 9am. We did not want to be rushed in any way and with the sun rising at 7am we felt that having to be out by 9 could of caused that. So we parked here, and walked an hour in the road. As the dawn came we could see the landscape illuminating around us. Honestly, you could shoot anywhere in this location and it would still be stunning. When the sun rose behind the mountains it sent shaft of lights either side into the valley. I could show you 10 images from this spot but I will include only a few. It was a frosty morning which added to the whole atmosphere. Again, lots of nice compositions available with both the wide and long lens. I never needed any wider than 24mm here.

A classic view - 24mm, F/11, ISO 100, 1.5 seconds

280mm , f/8, ISO 250, 1/100th

Taken with my favourite sun star lens - The Nikon AF-S 20mm 1.8G. I literally only use this lens for sunstars which is a bit mad! f/16, ISO 100, 1/200th second. Exposure blend
Given that the locations of Alp De Suisi and Seceda are relatively close together we decided to stick around, grab some food and head on for Seceda in the afternoon. Access to this location can be done via a 4 hour hike or a very convenient cable car which costs 25 one way or 37 return. The only caveat is the cable car was finishing at 4:00pm, sunset was 4:45pm. So we had to make the decision to either wait for sunset or head up a bit earlier, grab our shots and be happy with that. The weather was cloudy so we decided to stick around until 3:30 or so and save the legs the 2 hour hike down. Even so, Seceda blew my mind. What a place and it is defintely one I would highly recommend visiting. I’m glad we got some mood for it.

Drone shot - ISO 100, f5.6, 1/125th
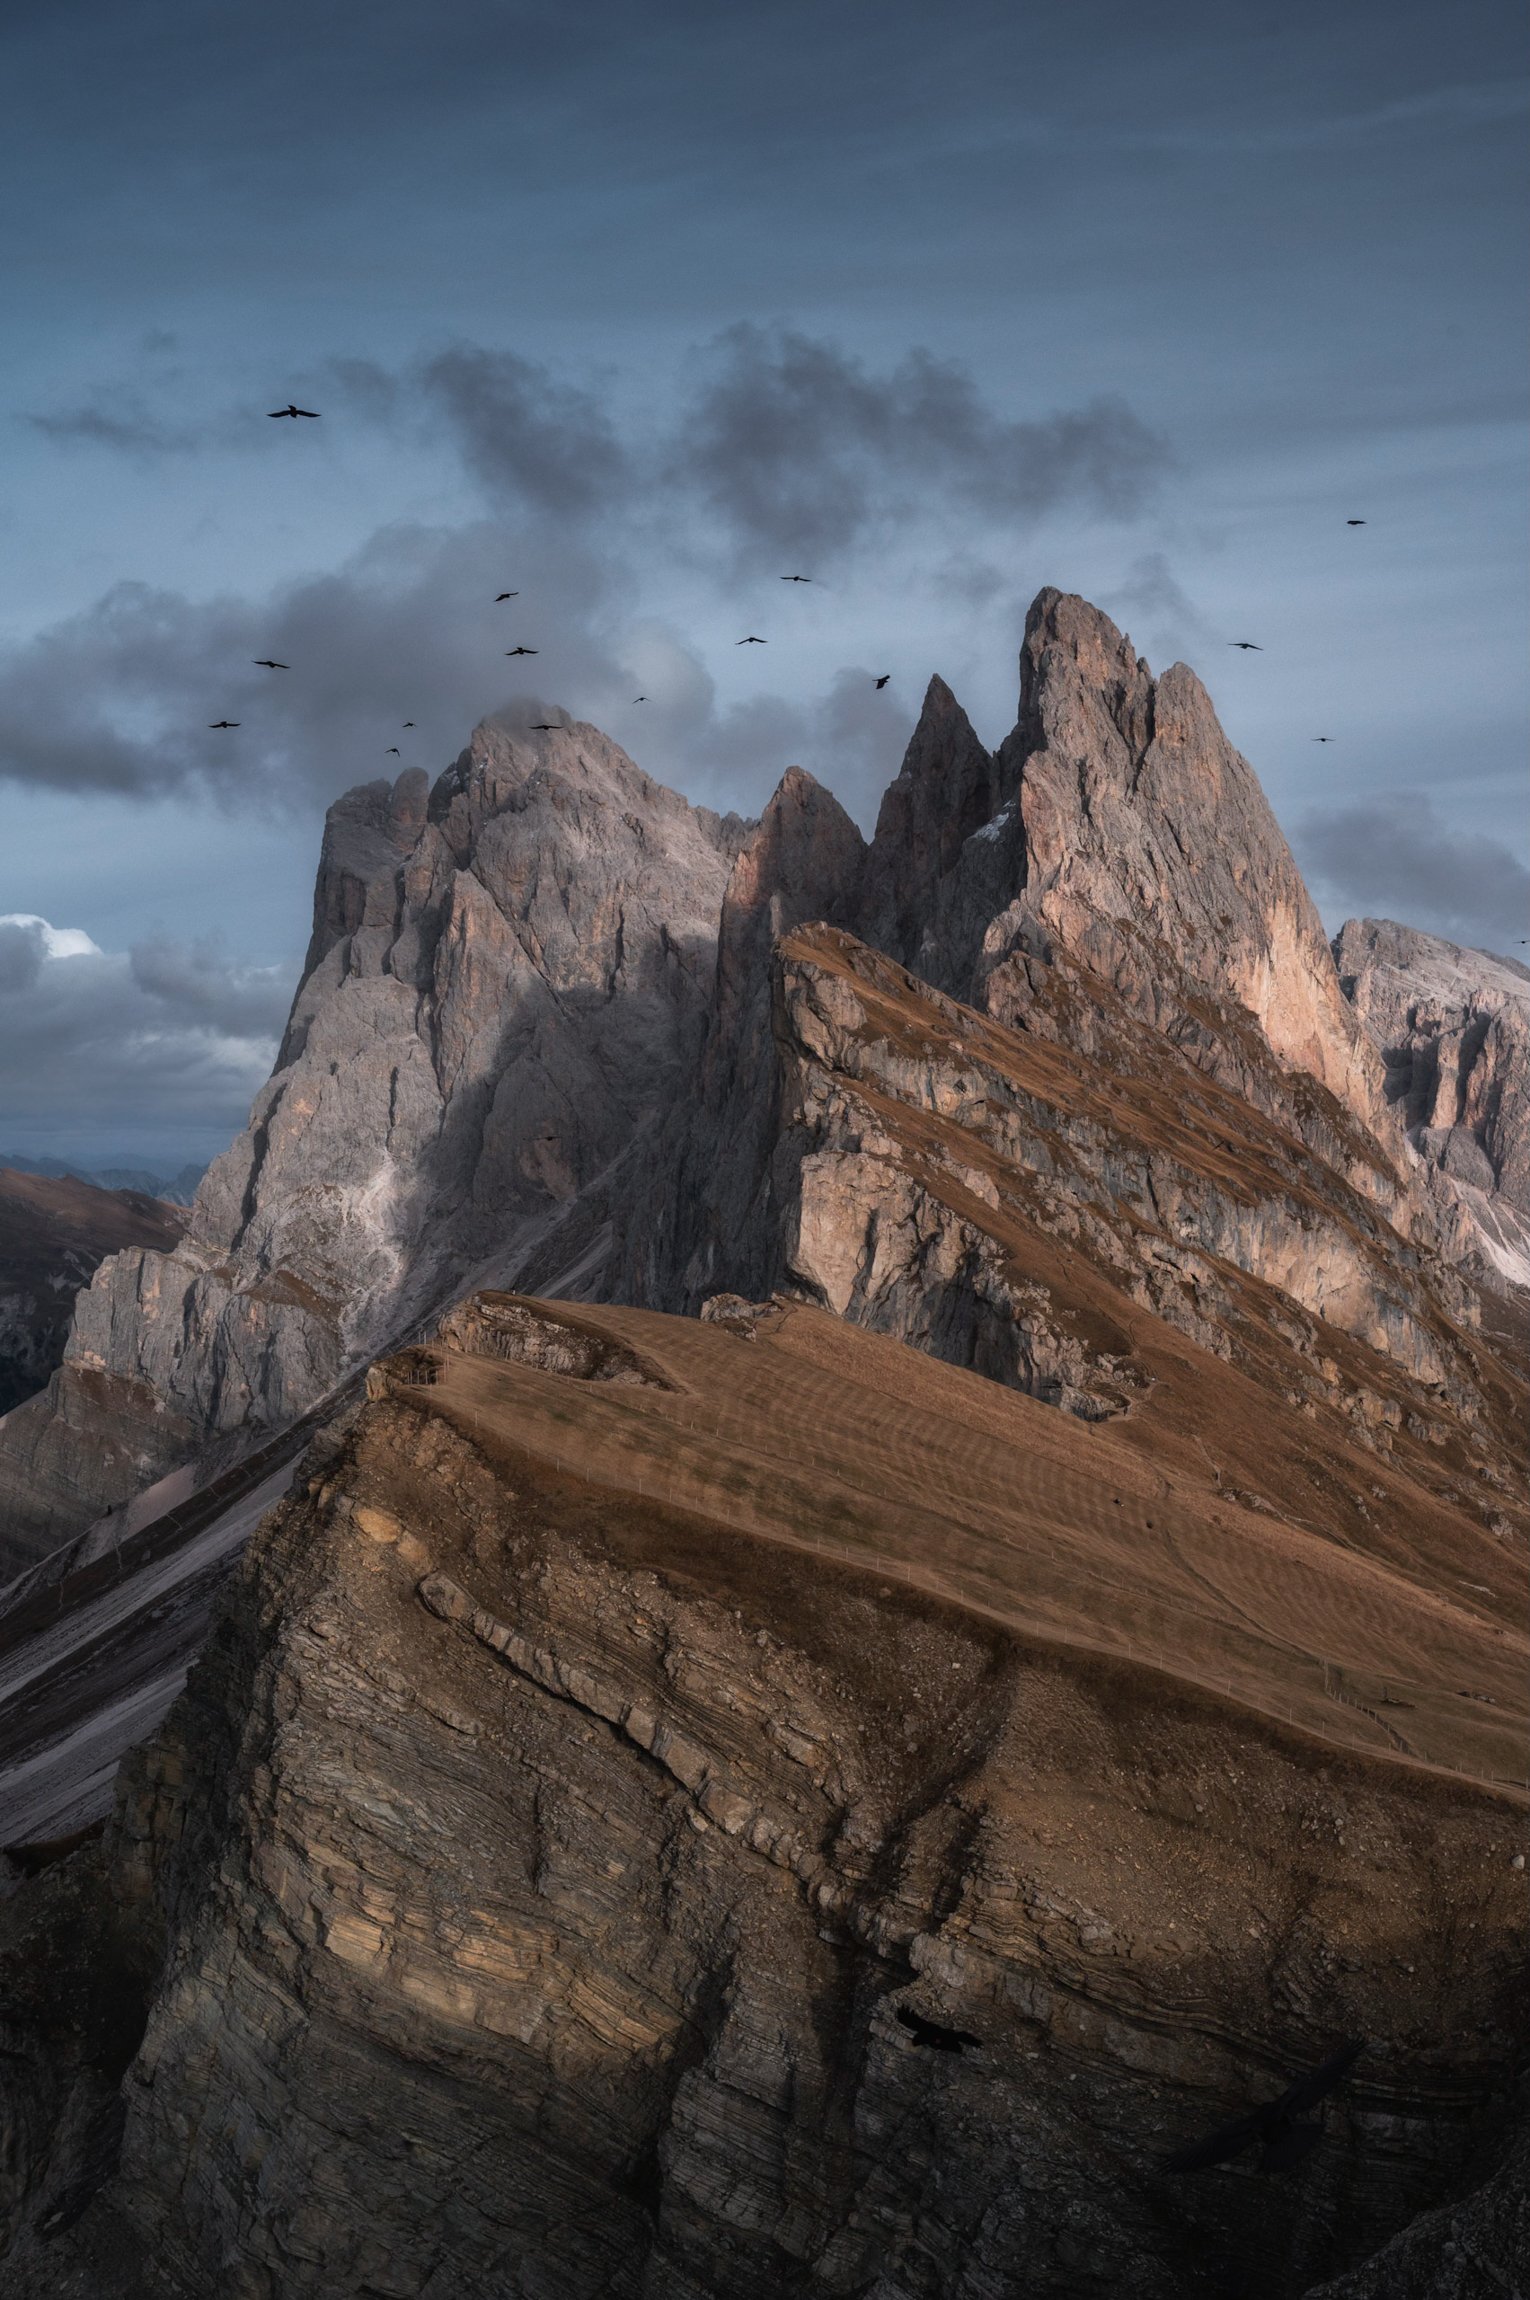
I managed to capture this flock of birds over Seceda. Thought it was something different. 1/500th second, ISO 800, f/11
Day 6:

Another drone image - the cloud surrounding the peaks adds another dimension to the shot.
If you’re still with me, thank you. At this stage the bodies are getting shook. I spent a long time looking at the weather and charts for day 6’s sunrise and came to the conclusion that we might be in for a cloud inversion of some sort. As we were tired we decided to head to a nearby location, the Giau Pass which was only a 25 minute drive away. Bear in mind it was only 8km from our house. That gives you an idea of how twisty the roads are, allow plenty of time for travelling to locations. We made for the small hill directly in front of the Passo Giau Refugio, there is a car park at the base of it and it’s a short 25 minute hike up to this vantage point. We had an incredible morning. A word of advice, if you’re standing on a hill pre sunrise and it seems dark/dreary just bear in mind that the landscape drastically changes when the sun comes up. We found ourselves shrouded in cloud one minute and the next staring down into a valley filled with low hanging cloud, mist and fog. When the light broke it really did transform the landscape and I sent up the drone to capture some footage and photos. I also fired off a long exposure to try and show some movement in the fog and the clouds.

Passo Giau and it’s surrounding peaks. My favourite drone image of the trip

5 exposures blended using mean mode to create a long exposure effect. Shot at 1 second, ISO 100 and F11. NiSi V7 filters
The day that followed was a bit grey and miserable but we made the trek to Passo Gardena. A place I really wanted to shoot in some incredible light. The light did not arrive but I still managed a nice moody long exposure using my NiSi filter kit.

15mm, F11, 30 seconds, ISO 100. CPL and 6 stop NiSi filter
Day 7:
Here comes the snow! Friday’s forecast showed heavy snow coming in around morning time. We woke up to some heavy rain and mist. Myself and another lad in the group Conor are huge fans of some woodland photography and trust me when I say that rain can make the most incredible conditions for woodland. If you have a camera that is somewhat weather sealed then you should not shy away from it! Pop a lens hood on the lens, stick on your rain coat and head for the woods. The fact that we were so high up meant the mist seeped into the woodland and we drove over Passo Giau and down into the valley to try find some nice pines to photograph. I came back with an image that I absolutely love. Considering the places I had seen so far this week and the images I got, the fact it was a woodland image that got me most excited so far speaks for the type of photographer I am I think!

50mm, F6.3, ISO 100, 1 second. Polariser to make the whole scene pop
What followed over the next hour was a very nerve racking drive home. As we drove back over the Pass the snow and ice had arrived and the roads were absolutely treacherous. It took us 55 minutes to drive the 8km home. Being the naive irish men we are, we stocked up on food and assumed we would be housebound for the rest of the day! Within an hour the snow ploughs were out, the roads were cleared and gritted. While waiting in the house we shot out the balcony at the snowy scenes around us, it looked stunning.

Shot out my bedroom window. 200mm, f6.3, ISO 500, 1/250th second

Drone shot of the pretty church in Colle Santa Lucia
In the evening it did not look great but we headed out anyway as we were getting cabin fever. We parked up on the road that is part of Passo Falzarego, the pin for the parking here. We got some really nice light mixed in with moody skies, the drones were used heavily here along with the long lens. Wind was very strong though and this can be an exposed spot so take care.

Drone shot - I love the cross at the top of the mountain. Adds so much scale to the scene
Our last morning of the trip brought some heavy snow. We were confined to shoot locally so we headed to - you guessed it - Passo Giau! Our third time hitting this location. Being totally honest by this stage of the trip I was wiped. The morning was absolutely freezing and I wasn’t too fussed about an image. I admired the incredible beauty of the snow. It was pristine and glistening. Hikers began early and it was cool to watch the headlamps head up the hills. I settled on a simple composition where a snow drift appeared to lean down towards the mountain itself.

16mm, F16, ISO 100, 1 second. NiSi CPL
So the time had come to leave. What an incredible trip. I’ll finish off this blog with a couple of tips:
Gear wise, you would be well looked after with something like a 24-120 or 24-105 and maybe a long lens, 70-200.
A drone is well worth bringing
Be prepared to put in the graft. Plan your locations for the right conditions and times of day. Use the pin drops I have included here.
If you really want to travel light, one camera, one 24-70 or 24-120 lens and a tripod. That will be more than enough. If anything I found having the various lens options made things a bit frantic for me. I kept swapping lenses because I saw compositions with the long lens or the wide angle. If I didn’t have those options then I wouldn’t even consider those scenes.
We were about a week late, if you want to see prime autumn colour I reckon aim for late september to mid october.
Most terrain we walked on was dry and easy to traverse so I got away with trail shoes most of the time. Only in Alp De Suisi did I need boots where it was wet.
If you have any questions please let me know, you can contact me via my socials or via the contact button on this website. If you found this blog helpful and think it might help you plan a group or solo trip to the dolomites please consider supporting me via the donation button at the bottom of this page. I would also encourage you to take a photography workshop in this incredible place if it was viable. You’ll be in safe hands and transported to all the locations as you relax and enjoy the views.
Until next time, all the best.